
| 일 | 월 | 화 | 수 | 목 | 금 | 토 |
|---|---|---|---|---|---|---|
| 1 | 2 | 3 | 4 | |||
| 5 | 6 | 7 | 8 | 9 | 10 | 11 |
| 12 | 13 | 14 | 15 | 16 | 17 | 18 |
| 19 | 20 | 21 | 22 | 23 | 24 | 25 |
| 26 | 27 | 28 | 29 | 30 | 31 |
- FTZ
- web
- 프랑스송금
- network
- 리눅스
- rootme
- 프랑스 교환학생
- 포너블
- 보안
- Gentoo
- 해킹
- 모인해외송금
- wargame
- 해커스쿨
- Linux
- 프랑스교환학생
- client
- EPITA
- Challenge
- 해외송금
- 네트워크해킹
- 웹해킹
- 백도어
- pwnable
- 모인유럽송금
- 모인유럽서포터즈
- pwnable.kr
- 유로송금
- 루트미
- WebHacking
- Today
- Total
Securing Keys
[Linux for Security] Gentoo 커널, 부팅, 네트워크 설정 본문

저번 포스팅에 이어서 Gentoo Linux 기초 환경 설정을 마무리하도록 하겠다
↓↓↓
https://secure-key.tistory.com/22
[Linux for Security] Gentoo 파일시스템 구성 및 Chrooting
저번 포스팅에 이어 계속해서 Gentoo Linux 환경 설정을 진행하도록 하겠다 ↓↓↓ https://secure-key.tistory.com/15 [Linux for Security] Gentoo Linux 파티션 포맷 및 마운트 Redhat, CentOS 등..
secure-key.tistory.com
일단 linux sources를 다운받는다
emerge gentoo-sources그리고 /usr/src/linux로 위치를 옮긴 후
cd /usr/src/linuxkernel configuration menu를 시작한다
make menuconfigkernel configuration menu가 시작되면, 우리가 설정해야 할 것은
cryptographic features를 enable시키는 것이다 (그래야만 encrypted된 /dev/sda3 파티션이 성공적으로 decrypt도 됨)
따라서 아래와 같이 설정을 해주고 save 한다

Reference: https://wiki.gentoo.org/wiki/Dm-crypt/ko
Dm-crypt/ko - Gentoo Wiki
dm-crypt는 리눅스 커널 암호화 API 프레임워크와 장치 매퍼 하위 시스템을 활용한 디스크 암호화 시스템입니다. 관리자는 dm-crypt로 전체 디스크, 논리 볼륨 파티션, 단일 파일을 암호화할 수 있습니다. dm-crypt 하위 시스템은 암호화 데이터 접근에 다중키를 허용하며, 키를 다루기도 하는(키 변경, 암호 추가 등)리눅스 통합 키 설정(LUKS) 구조를 지원합니다. dm-crypt에서 비 LUKS 설정도 지원하지만, 이 글에서는 유연성, 관
wiki.gentoo.org
그 후 kernel을 아래의 명령어로 compile 해준다
make -j8
make modules
make modules_install
make install
다 완료되면, 아래의 명령어를 통해 새로운 kernel이 /boot에 존재한다는 것을 확인할 수 있다
ls -lh /boot
이제 cryptsetup을 사용하면서 genkernel을 설치해야 한다
genkernel의 의존성을 위해 아래의 파일에 USE flag를 지정해주어야 하고,
이로써 부팅할 때에 /dev/sda3를 decrypt하기 위해 설치될 것이다
nano /etc/portage/make.conf위와 같이 파일을 열면 USE="cryptsetup -firmware" 을 추가해준다
(-firmware는 firmware dependency를 제외하기 위함이다)
그리고 /dev/sda3의 decryption을 담당하는 initramfs을 아래와 설치한다
rmdir /etc/portage/package.use
nano /etc/portage/package.use (여기에 sys-apps/util-linux static-libs를 추가함)
emerge genkernel --pretend --verbose
emerge genkernel -qj
genkernel --luks --install initramfs
그리고 /etc/fstab에 우리가 설정해 놓은 파티션들에 대해 설정을 해놓는다
nano /etc/fstab/dev/sda1 /boot ext2 defaults,noatime 0 2
/dev/sda2 none swap sw 0 0
/dev/mapper/root / ext4 noatime 0 1
이를 /etc/fstab에 추가를 해놓는다
이로써 부팅할 때마다 더이상 우리가 link 해주지 않고도 자동으로 mount되게끔 해주었다
이제 GRUB Boot manager를 설정할 차례이다
emerge grubgrub configuration file을 /dev/sda3의 encryption으로 설정을 해 놓아야 한다
nano /etc/default/grubGRUB_CMDLINE_LINUX="crypt_root=/dev/sda3"
따라서 위와 같은 내용을 grub configuration file인 /etc/default/grub에 추가해 준다
grub-install /dev/sda
grub-mkconfig -o /boot/grub/grub.cfg
네트워크를 위해 필요한 프로그램을 설치해주고,
emerge -pv netifrc dhcpcd
emerge dhcpcd -q
network interface 이름을 얻은 후에,
ifconfig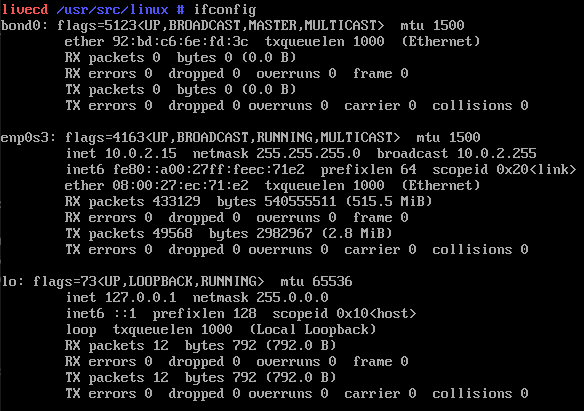
여기서 network interface 이름은 enp0s3
그렇게 알게 된 network interface name을 network configuration file에 넣어준다
nano /etc/conf.d/netconfig_enp0s3="dhcp"와 같이...
그리고 부팅할 때마다 자동으로 networking을 실행시켜 주기 위해 아래와 같이 설정해준다
cd /etc/init.d
ln -s net.lo net.enp0s3
rc-update add net.enp0s3 default
hostname을 설정해주고,
nano /etc/conf.d/hostname본인은 hostname="gentoovm" 이라고 추가해주었다
그리고 hosts file을 아래와 같이 편집하였다
nano /etc/hosts127.0.0.1 localhost gentoovm
::1 localhost gentoovm
참고로 만약에 keymaps 설정이 필요하다면 다음과 같이 하면 된다
nano /etc/conf.d/keymapskeymap="uk"를 추가한다
이어서 cronie과 log manager를 설치하고,
emerge -pv cronie sysklogd
emerge -q cronie sysklogd
이 또한 부트 리스트에 추가해준다
rc-update add cronie default
rc-update add sysklogd default
잊지 않고 root 비밀번호도 설정해주고, 다 끝났으면 chroot를 빠져 나온다
passwd root
exit
mount 되어 있던 모든 devices를 umount해주고 재부팅한다
umount /mnt/gentoo/boot
umount /mnt/gentoo/proc
umount -R /mnt/gentoo/dev
umount -R /mnt/gentoo/sys
cd /
umount /mnt/gentoo
reboot

'IT > Linux' 카테고리의 다른 글
| [FTZ] Level 2: SUID가 걸린 vim에서 명령 실행 (0) | 2020.08.30 |
|---|---|
| [FTZ] Level 1: SetUID로 찾은 백도어 이용하기 (0) | 2020.08.30 |
| [Linux for Security] Gentoo 파일시스템 구성 및 Chrooting (0) | 2019.12.07 |
| [Linux for Security] Gentoo Linux 파티션 포맷 및 마운트 (0) | 2019.10.30 |
| [Linux for Security] Gentoo Linux 설치 및 파티션 나누기 (0) | 2019.10.07 |


